Validate a CSV
Basic command
Use the validator by passing a DDL file and an input CSV file:
bin/omop-csv-validator \
  --ddl ddl/OMOPCDM_postgresql_5.4_ddl.sql \
  --input path/to/PERSON.csv
The command:
- loads table schemas from the DDL
- infers the table name from the CSV filename
- validates each row against that schema
Validation is performed row by row. Large OMOP exports do not need to be fully loaded into memory before the tool starts checking records.
For implementation details, engine tradeoffs, and local benchmark data, see the Implementation section.
The validator matches columns by header name.
If you later need a file in canonical DDL column order for import workflows such as SQLite .import or positional database loads, use reorder-csv.pl.
One table per run
The validator accepts one input CSV file per invocation.
That means each run validates one OMOP table at a time, such as:
PERSON.csvDRUG_EXPOSURE.csvOBSERVATION.csv
If you need to validate multiple OMOP tables, run the command once per file from a shell loop, workflow manager, R script, or Python script.
Batch validation in Bash
If you have many OMOP CSV files in one directory, a shell loop is usually simpler than adding batch behavior to the validator itself.
Example:
for csv in exports/*.csv; do
  echo "Validating $csv"
  bin/omop-csv-validator \
    --ddl ddl/OMOPCDM_postgresql_5.4_ddl.sql \
    --input "$csv" \
    --json
done
This keeps validation one table per run, while still making folder-level workflows easy.
Batch validation in R
You can do the same thing from R by looping over files and calling the CLI once per CSV.
library(jsonlite)

csv_files <- list.files("exports", pattern = "\\.csv$", full.names = TRUE)

results <- lapply(csv_files, function(csv_file) {
  raw <- system2(
    "bin/omop-csv-validator",
    args = c(
      "--ddl", "ddl/OMOPCDM_postgresql_5.4_ddl.sql",
      "--input", csv_file,
      "--json"
    ),
    stdout = TRUE,
    stderr = FALSE
  )

  fromJSON(paste(raw, collapse = "\n"))
})
If you want more detail about the JSON result shape, see Use from R.
Batch validation in Python
You can also loop over files from Python and call the CLI once per CSV.
import glob
import json
import subprocess

results = []

for csv_file in glob.glob("exports/*.csv"):
    completed = subprocess.run(
        [
            "bin/omop-csv-validator",
            "--ddl", "ddl/OMOPCDM_postgresql_5.4_ddl.sql",
            "--input", csv_file,
            "--json",
        ],
        capture_output=True,
        text=True,
        check=False,
    )

    results.append(json.loads(completed.stdout))
If you want more detail about the JSON result shape, see Use from Python.
The validator normally infers the separator automatically.
Only pass --sep if your file is unusual or if automatic detection is ambiguous. For example:
bin/omop-csv-validator \
  --ddl ddl/OMOPCDM_postgresql_5.4_ddl.sql \
  --input example/DRUG_EXPOSURE.csv \
  --sep $'\t'
Override the inferred table name
If the CSV filename does not match the OMOP table name, pass --table:
bin/omop-csv-validator \
  --ddl ddl/OMOPCDM_postgresql_5.4_ddl.sql \
  --input path/to/export.csv \
  --table person
Save the derived schemas
You can also write the generated schema set to JSON:
bin/omop-csv-validator \
  --ddl ddl/OMOPCDM_postgresql_5.4_ddl.sql \
  --input path/to/PERSON.csv \
  --save-schemas schemas.json
Machine-readable JSON mode
If you want to consume validation results from R, Python, or another language, use --json:
bin/omop-csv-validator \
  --ddl ddl/OMOPCDM_postgresql_5.4_ddl.sql \
  --input path/to/PERSON.csv \
  --json
This returns one JSON object with:
- whether validation succeeded
- the schema name used
- the number of failing rows
- row-level error messages when validation fails
The JSON mode still processes the input row by row. In practice, that means memory usage grows mainly with the number of failing rows returned in row_errors, not with the full size of the input file.
Spreadsheet-friendly review output
If you want a review artifact for Excel or LibreOffice users, the CLI can generate:
--report-tsv--report-xlsx
The validator still reads CSV or TSV as input. These flags only change the optional output artifact.
See Spreadsheet Reports for the exact input/output behavior and when to use each mode.
Reading the result
If validation succeeds, the command exits with status 0 and prints a success message.
If validation fails, the command exits with status 1 and prints:
- the failing row
- one or more validator messages for that row
In --json mode, fatal setup errors such as “no schema found” return exit status 2 with a fatal_error field.
For large files, the validator starts checking rows immediately rather than waiting to read the whole file first.
Example of the default human-readable error output:
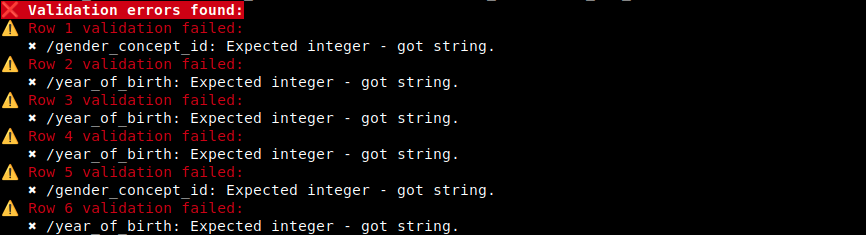
What counts as a row
The CLI reports data-row positions, not header positions. The first data row after the header is reported as row 1.